
Before I dive into this, I just wanna give a huge shout out to Matty Vogel for making one of the most helpful blogs ever. Actually, all of his blogs are helpful but his workflow blog in particular was a huge life saver. Read it here if you would please.
Let's jump right into, shall we?
PRE-TOUR
When I found out I would be going on tour, I tried my best to get everything I had ever taken organized. This meant I needed to buy a back-up hard drive since I only had one, but I ended up buying two instead.
My first purchase was the Seagate Expansion Desktop External Drive. I bought the 4TB from amazon. This lil big guy must be plugged into an outlet in order to be used, so it stays at home and it is my main back up drive. Every photo I've ever taken is on it. It never, under any circumstances, leaves my house.
I then purchased the Seagate Back-Up Slim, 2TB. This is my main hard drive. It also has everything I've ever taken, but it comes with me whenever I work away from home. I already had the WD 500GB hard drive which was my main drive, but there was no way I was going on tour without backing my stuff up. So I invested; it was bound to happen sooner or later.
Once I got everything set up, I made sure everything was backed up on the Seagate Desktop Slim drive, and the WD was empty. That way I could store everything on there and use it as the back-up drive on tour.
Before I left for tour, I created a system to help me get organized as soon as possible. I made 3 distinct folders: for videos, and then for both tours [Summer + Warped tour]. This folder was on my desktop and my hard drive.

Inside the individual tour folders was this. Ignore the Amanda folder, those are photos of a friend that I separated to again, stay organized. Inside the "Marina City Tour 2016" is the Lightroom catalog, and in the "Dates" are all the photos.

In the "Dates" folder I decided to split the images of both bands on the tour, Marina City and Sleep On It. And in each of those were the folders for each individual date. Now we're ready to drag and drop the photos every day.

Onto the next step: Dropbox folders for days. I pretty much copied and pasted the date folders and made them into DB folders for the guys. Before this however, I connected my DB to my laptop. For that, you're going to need to download Dropbox and follow these steps. Once that's done, the Dropbox folder should appear on you "Favorites" tab and now you can drag and drop anything in there and it will automatically sync to your DB. Woooo. I deleted the June tour folders, so I'll just post the Warped folders. This is how mine looks like:
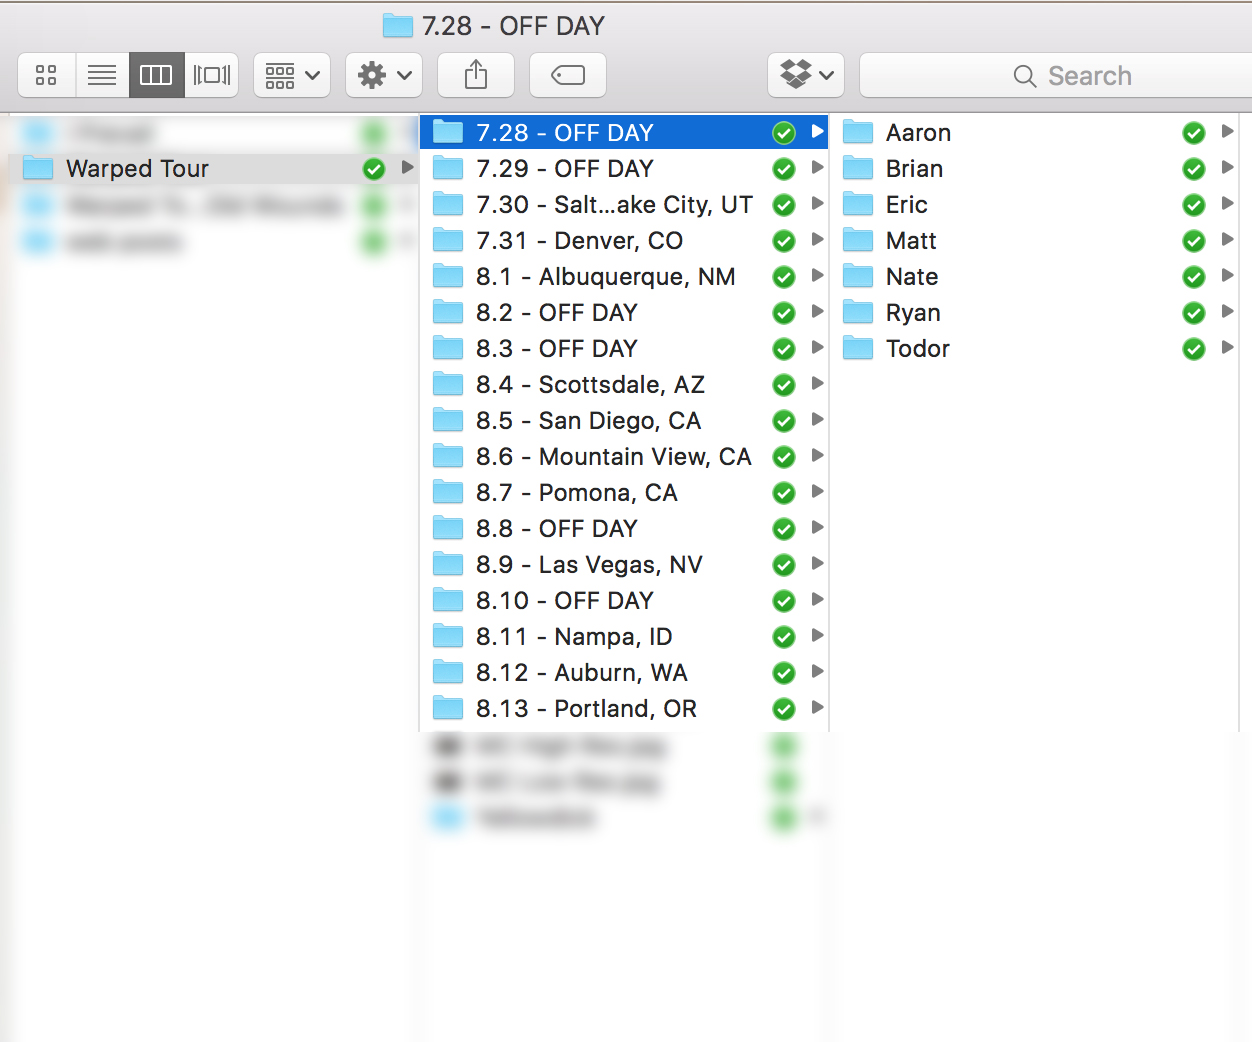
Everyone gets their own folder each day. I did it backwards on the June tour, and found it to be a bit annoying when uploading. It was NAMES > DATES instead of DATES > NAMES. It's personal preference though. So that's the pre-tour work.
TOUR TIME
On the June tour, I made sure I shot each live set on a separate memory card so that transferring the photos would be quite simple. On warped however, everything was shot on the same card/cards. For the June tour, I dragged all the MC photos in the MC folder for that date, and the same for SOI. On Warped, all the photos stayed together, I just focused on MC and OW when editing.
Everything was dragged onto my desktop first, and once I finished editing, I backed them into both hard drives. Since I had each date separated, editing in LR was a breeze. I made presets for different lighting colors and threw those presets on the photos as I went. Lightroom does have the option to import images with a preset, but I did not use that on the June tour [on Warped I did] because every venue had different lighting rigs, colors (or lack thereof), etc. Here's how I organize my presets:

This helps me edit faster. If a photo had red lighting, then I'll go into the "Red" folder and choose one of those, tweak it if I want, and done.
However, before I edit anything, I go through all the photos and pick what I wan to keep. If I want to keep it, I'll rate it (I just give everything a 5) and move on. Once I finish going through all the photos, I go through the unrated ones very quickly, make sure I didn't miss any hidden gems, and then delete them. I then go back to the rated photos and begin to edit.
Once everything is edited and ready to go, I am ready to export. I begin one member at a time. I use the filter presets to organize my exports, these can be found on the bottom right.


Everything I am keeping is rated. What I am exporting first gets a color (blue / 9 on mac), the filter/preset for this is "Ready for Export." Any photo that is labeled with a rating and blue will appear when I click that preset. I then export those to a folder I create on my desktop under the name of whatever city we're in, web size, and I name the photos "NameOfBandMember-file#." The reason I keep the file # is incase I want or need to re-edit it, I can find it easily by searching for it. Sometimes I'll edit a photo, try to upload it to instagram or something and I'm like woah this edit looks really crappy on my phone! So I re-edit it quickly and just save the fixed version again. These are my export settings:

I always resize my photos to less than 1.0MB and hit "Don't Enlarge" because I don't want my file sizes to be huge. It takes up too much space on DB and people's phones, plus, it doesn't kill the quality (unless it's on Facebook but whatever).
Once I export that person's batch of photos, I label them another color (red / 6 on mac) and they go to another preset folder, "Exported." Everything in that folder I know has been exported. Before this though, I make sure that if other people are in those photos, I export them under their name as well to make sure everyone is getting the photos they're in. For example, if I'm exporting all the photos Brian is in, and Eric is in one of them, I'll export that same photo and name it "Eric-file#" so that he also gets that in his DB folder. Some photos will be duplicates because of this, but hey, everyone deserves to get their pics. I do this for every member until I finish. It usually takes me around 5-10 minutes to export everything, so it's not too bad. Knowing the keyboard shortcuts has saved me a ton of time. TYBG hashtag blessed.
Once everything is exported into one folder, I simply drag and drop all the photos to the DB folders. All the Matts go into Matt's folder etc.
So that pretty much is my workflow on tour! Now, uploading/finding wifi/editing on the road is a whole other beast to take on. During the June tour, I found it pretty easy to do because I was able to work right after MC played since they opened for SOI. I had a place to plug in my stuff, and usually wifi at the venue. Warped however was much harder. Taking my laptop out meant it would overheat pretty fast and get super slow, plus I had nowhere to plug it in so I had to be conscious of my battery life. I was able to find a Starbucks or something sometimes, or we'd stay at a hotel or someone's house where I left it charging. This meant I could work on MC + OW photos, and their photos only.
Because of this, I would usually export everything right as we were leaving the venue so I could have my brightness down and edit in the dark which saves battery. I would edit a bit on the drive, accidentally fall asleep (I'd turn it off of course), and finish editing the next morning. The guys would get the photos first thing and before doors, and they would also get custom posts with their set times. I would simply airdrop the set times posts instead of uploading them to DB; Airdrop is a life saver by the way. No wifi needed, just bluetooth. It made my life so great. Sigh.
EDITING
Now that I've told you all about my workflow, I want to answer some Qs I get about editing etc.
I'll start off by saying that I believe people are afraid of editing sometimes. So, don't be! Holy smokes guys, you gotta experiment and get to know everything about your gear and software to get the most out of your art. With that said, I'm going to include some before and afters w/ some info on the editing that went into the images.
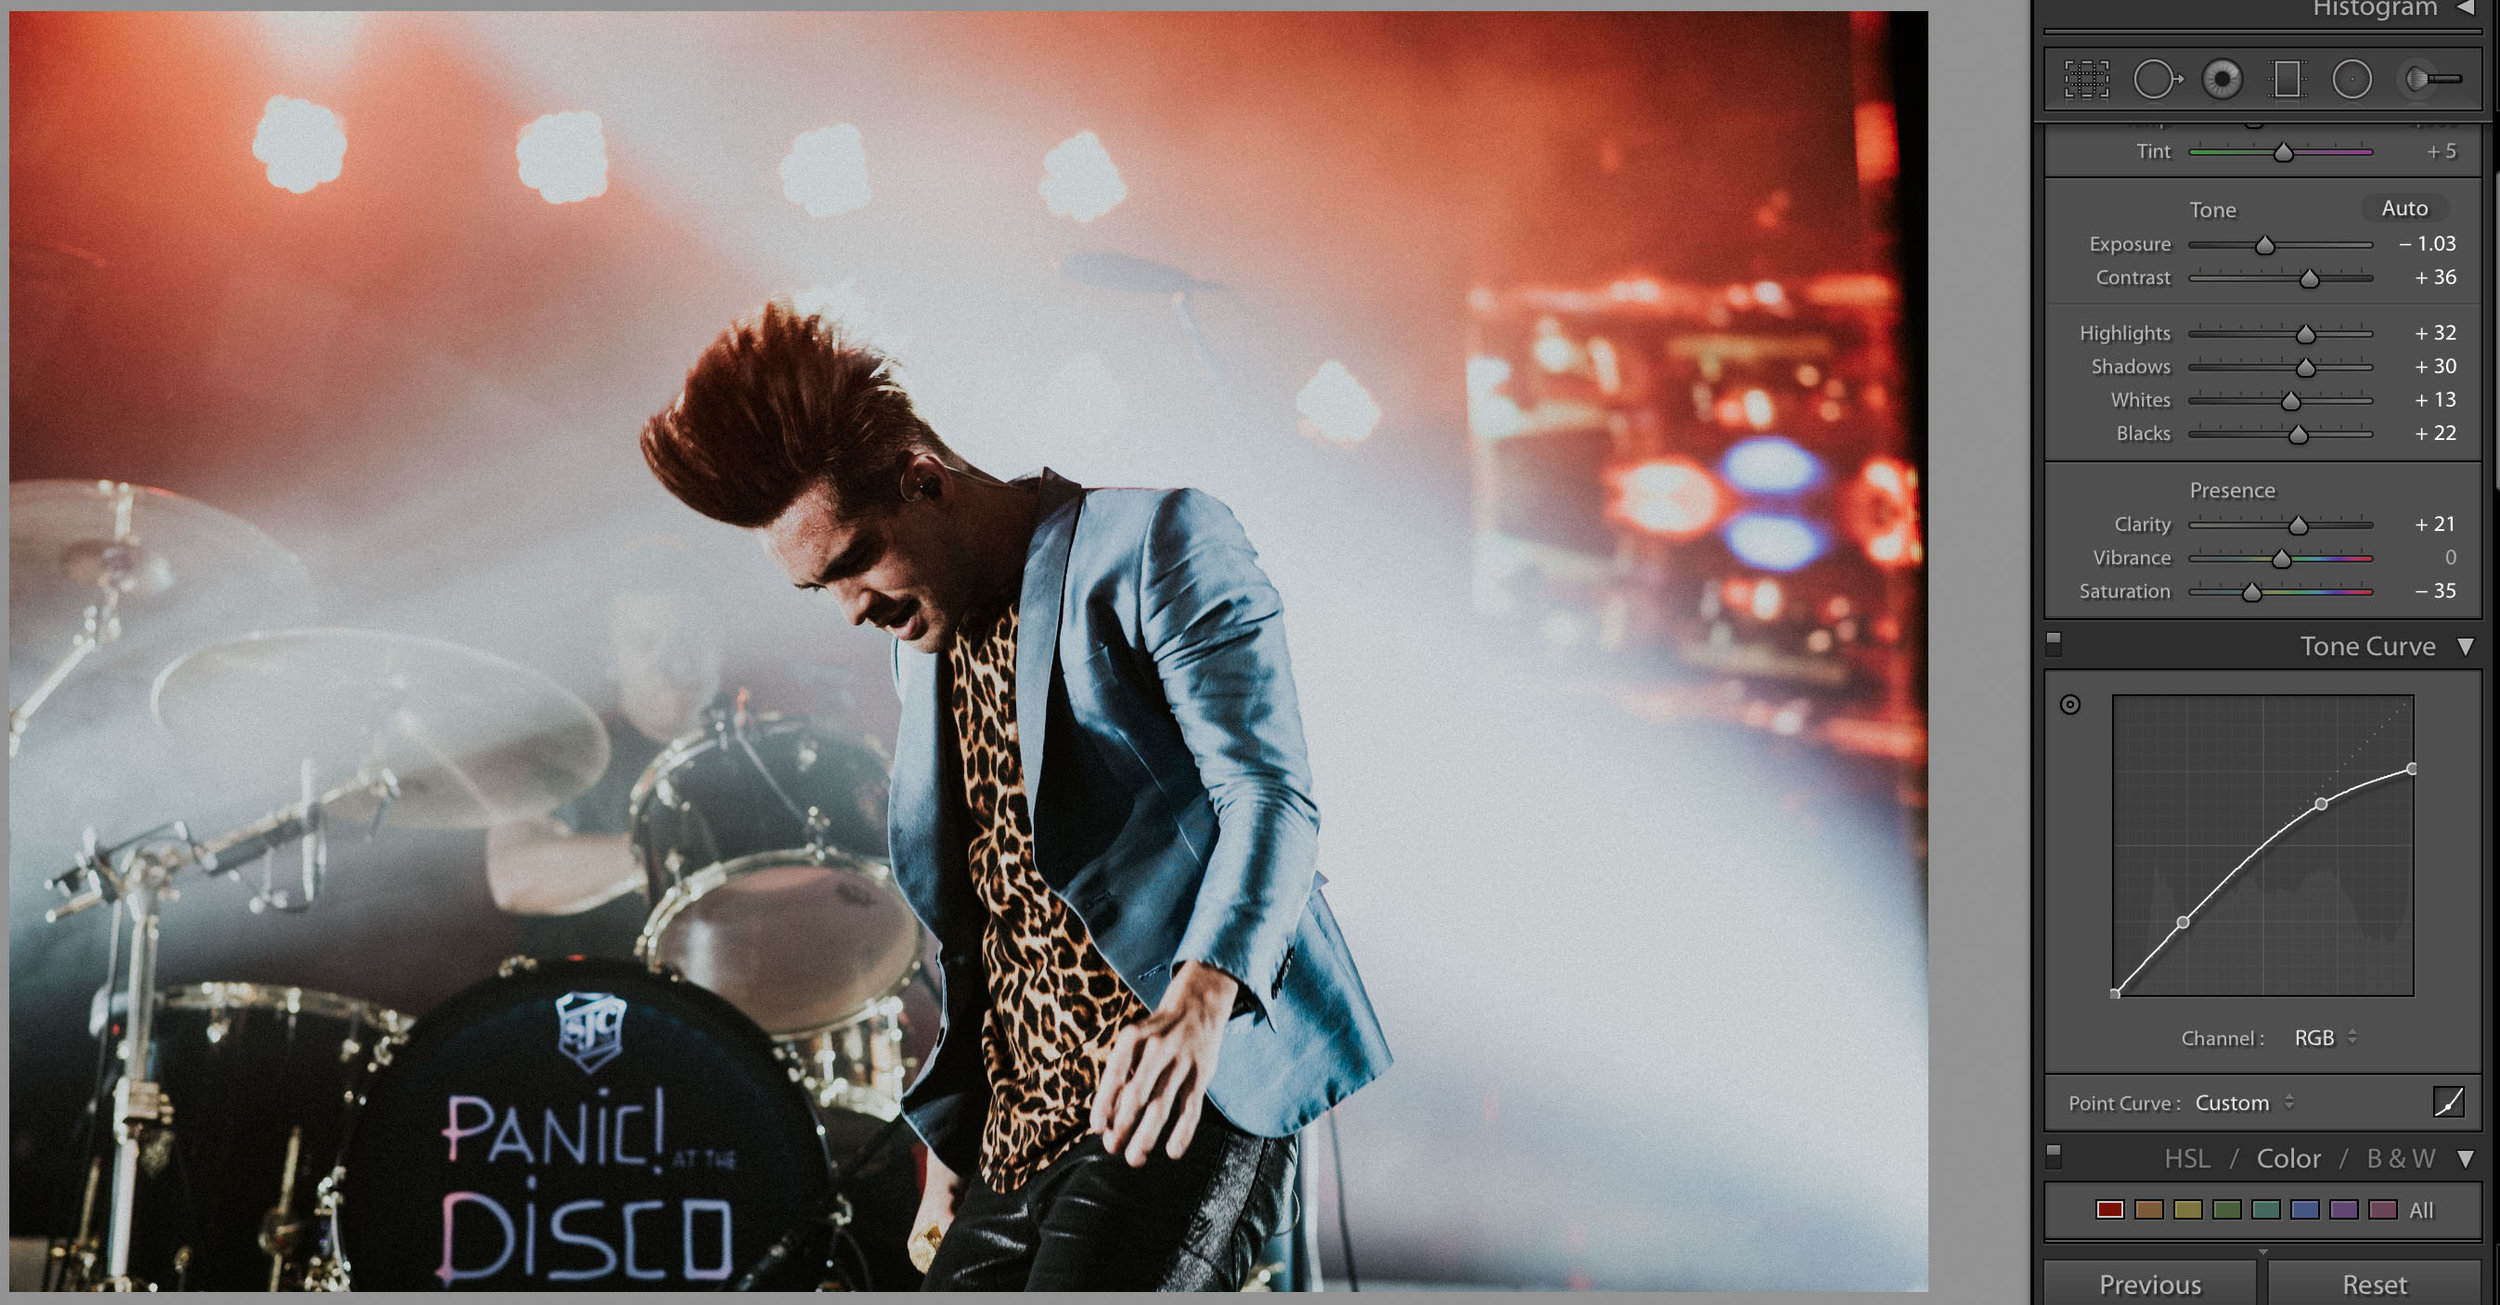
THE USED // SIMPLE REDS + SMALL FADE

For this photo, I loved the red tones and decided to keep them. I simply tweaked the curves and added some color to the shadows by split-toning to make it more bearable.

Learning how curves affect your photo is one of the best things anyone can learn. I've made each point a different color so I can explain to the best of my abilities.
There are 4/5 different curves you can alter. The region curves with sliders, probably the easiest to begin with. Then there are the ones with channels, where you can create anchor points to alter the image.
There's the RGB which focuses on contrast, shadows, blacks, whites, and highlights. Then the individual color channels, Red, Blue, and Green. These affect the tones in the contrast, shadows, blacks, whites, and highlights.
This is how the points affect my photo. You can create points on a tone curve and place them anywhere, move them, tweak them etc. They don't have to look like this every time. Experimenting is key. Always.
The green point affects the contrast/ If you bring it up, it'll give your photos a "faded" look. So there's not much contrast there, and the shadows are kind of gone. To add contrast again, you can bring the pink point down a bit. If you take it lower than the green then it'll make it super contrasty and often will make the shadows/blacks look obvious. Pics below.
The yellow can mute highlights/whites. If you bring that with the orange down, it can make the highlights and whites look muted, aka the same tone.
The purple one controls the highlights, the higher it is the brighter the photo.

green point down / no fade

some fade / small contrast

strong contrast

reaaaally strong contrast + fade
PANIC! AT THE DISCO / NORMAL TONES + MUTED HIGHTLIGHTS

This photo I again wanted to leave a bit simple. I upped the contrast, lowered the exposure and muted the highlights which is yet another thing that can be done in curves.

This is how the curve looked for this photo. Remember the highlights are controlled by points on the right side. To mute them, bring the last point on the right down a bit.
If you take it up, it'll make the whites look very very white, down makes them more gray-ish.

highlights are bright and a different color (look how it goes from white>blue>greenish>grey)
curve is good, muted whites, not too shabby

this is a mix of muted but bright highlights, and a lot of fade + contrast. I've seen this editing style a lot lately so I thought I'd show it
MELANIE MARTINEZ / SPLIT TONE, CURVES, HSL, + COLOR CORRECTION

This edit a tad bit more complex but I think it's good to see how far you can go with editing. As much as I love blues, I wanted something warmer for this photo so this is the end result. I started with changing the tint + temperature of the photo, color correction, then changed some hues on the HSL bars. After that, I went into the curves and tweaked them until I got what I wanted.
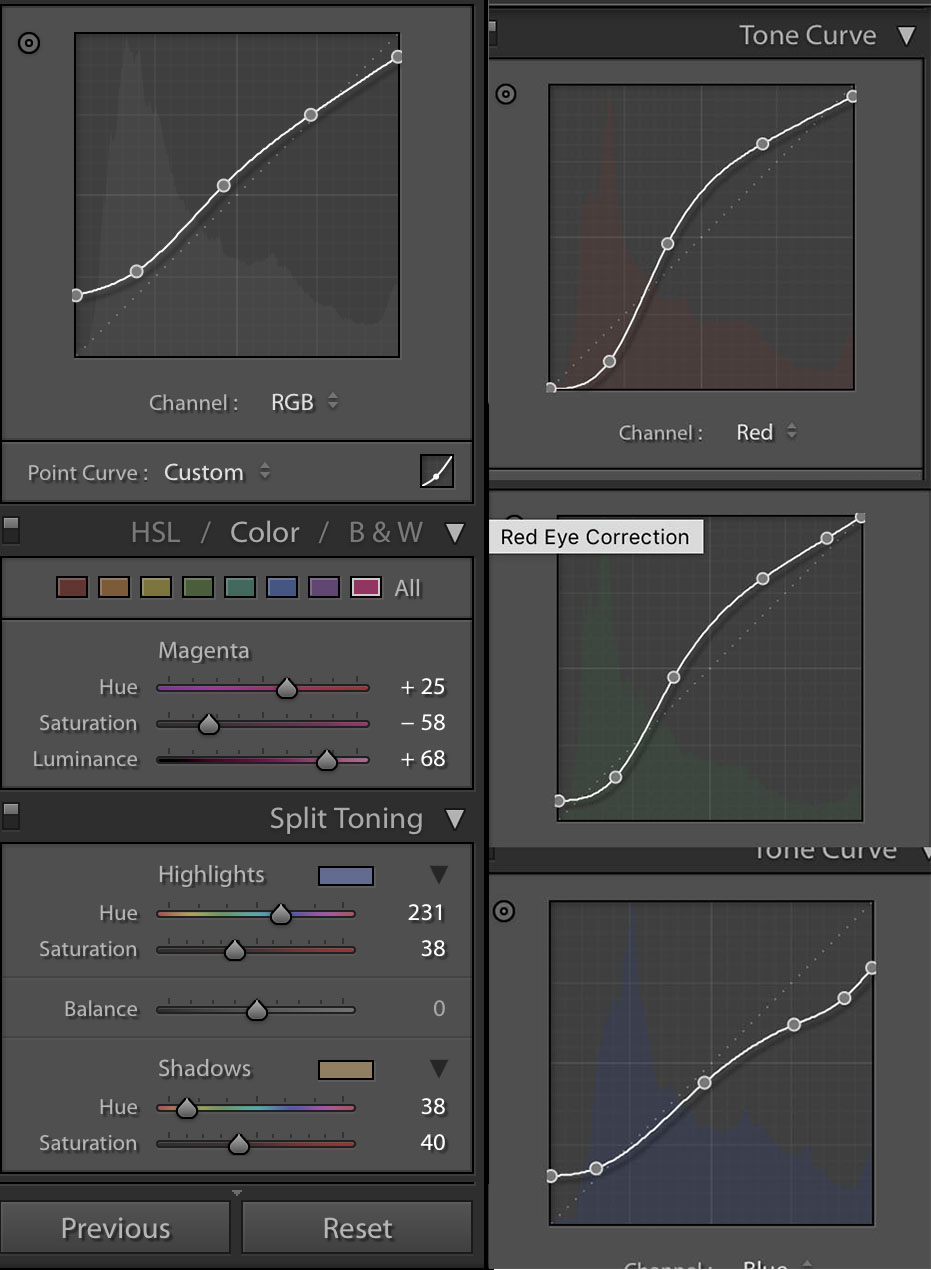
Again, the curves don't have to look like this. You just gotta understand what each anchor will alter, the placement and distance is important. Mess around with them and learn how it affects the photos. You really just have to do this a few times until you develop a preset that you think will fit various photos.
If I changed the first anchor on the left side of the red channel, it would affect how much red is in the shadows/blacks of the photo.
If I changed the highlight points in the red channel it would affect the blocks since that's where the highlights are. Bringing it down would make them be cyan/blue, higher would make it peach/light red.
This is how the rest of the settings looked. You get the gist of it, right? Split toning helps to add some colors/tones that might not have been in the image before.
For example, I added a warm orange/brown to the shadows to cancel some of the blue in the image. I added some cool tones in the highlights because I wanted to bring those tones back after I had removed most of the purples/blues in the photo.
OLD WOUNDS + ICE NINE KILLS / REMOVING BACKGROUNDS


While there are many ways to do this, I'm gonna show you the easy (and simple) way of doing this. Alright it's the lazy way. There. I said it. I'm lazy. Moving on. Usually, in order to remove the background of an image, you would want to open said image in Photoshop and do all the magic in there. However, when you're a lazy butt like me, Lightroom works just fine :~)
Basically all I did was use the Brush tool, and over-exposed every dark object on the photo. Yup. That's it.
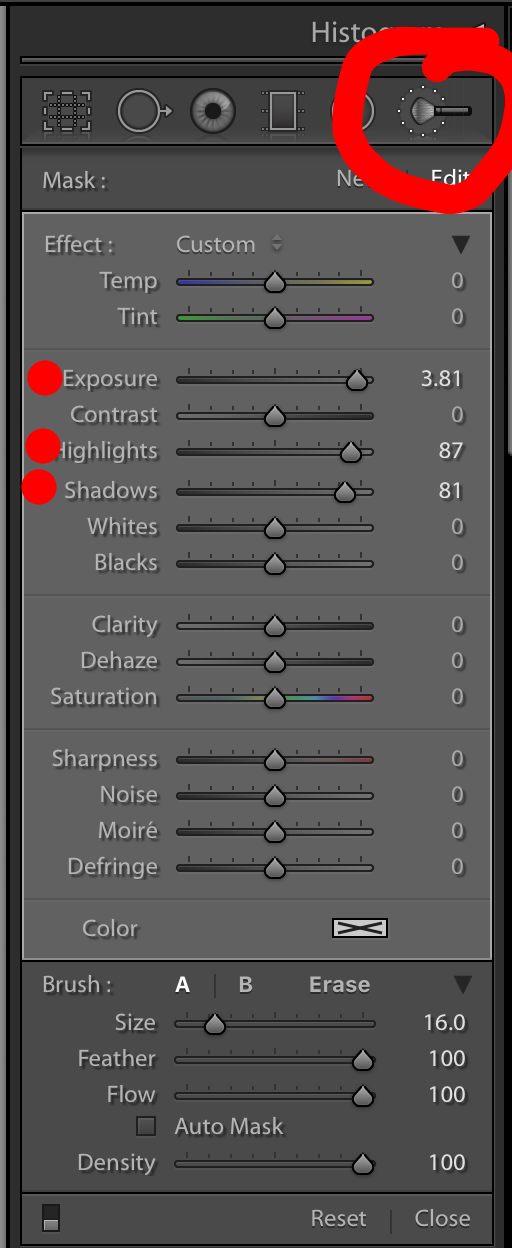
The brush tool is going to be the last little drawing under the word "Histogram." This can be used for small details that need to be changed in the photo, where you don't want to change the whole pic. I went it, brought up my expose, highlights, and shadows and bam. I didn't touch the whites and blacks because it made the tones go a lot brighter than it should and it looked bad. It was like two different "background" colors. Nah, I'm good thanks.
In order to get in the little hairs/small details I simply made the brush size smaller and feathered it out slowly.
Citizens of earth, my dudes and dudettes, peeps, homies, that concludes my Warped Tour Recaps. Thanks so much for reading, or staring at the images if that's all you did. Thanks for the support, for the questions and suggestions, for everything. I hope that I was able to help you out in some way, and I hope this wasn't too confusing.
If you have any other questions about anything, don't hesitate to reach out! If you'd like to see more before/afters also let me know. Tweet, email, whatever. Don't be afraid to try new things with your art. If you end up learning something from this, show me! I love seeing people's work. I hope I have helped at least one of you. Thanks again, and until next time.